First steps in bare-metal programming using UEFI – part 2
This series of articles describes how to start writing bare-metal programs for modern PCs, using Linux as the development platform. By “bare metal” I mean without any operating system: the application will be run directly by the computer’s EFI firmware.
In the first article in the series I
described how to compile, link, and transform a C program into a PE32+
executable that EFI understands. The EFI application was called
test.efi, because I have no imagination.
We now have to see how to install test.efi onto a hard
disk, and boot from it.
DANGER!
Do not attempt to do this on a hard drive you use for anything else! If you follow the steps below, you will render your computer useless. Use a spare hard drive or, better still, a virtual hard drive in a VMWare or VirtualBox virtual machine.
There are other ways to boot the EFI test application. You might, for example, create a bootable DVD or USB flash drive. I’ve decided to explain how to boot from a hard drive first because, although it’s fiddly – and potentially risky – it’s relatively easy to understand. Moreover, you’ll almost certainly want to boot from a hard drive eventually. I’ll explain how to boot from removable media later.
If you don’t have a spare hard drive in your PC, or you’re using a laptop which doesn’t even allow you to install one, I’d suggest using a virtual machine. It’s a lot easier to test with a VM, anyway. Or just skip this step entirely, and jump ahead to the next article, which describes how to install the EFI program on a DVD or USB flash drive. That’s a lot safer, of course, but harder to understand if you haven’t installed on a hard drive first. The choice is yours, but please be careful if you use a real computer, and don’t try to use your system drive.
Adding and preparing a hard drive
I recommend following this procedure using a VirtualBox VM. You’ll need to install Linux on the VM first – not to run the application we’re testing, but because Linux has the tools to prepare the hard drive and copy the application onto it. When you’ve installed the EFI application, you’ll see that you can disconnect the Linux drive completely, and run the EFI program on bare metal.
It doesn’t matter what kind of Linux you install on the VM (or real
computer), but it needs to be a 64-bit distribution if you’ll also use
it to develop the EFI application. A very minimal Linux will
suffice, however, if it’s just for preparing a hard drive. However,
you’ll need the mkfs.vfat utility; on Ubuntu-like systems
you can apt install dosfstools.
Note
VirtualBox VMs don’t support EFI by default. You must enable EFI (in the VM Settings page, System tab) before installing Linux. This is because Linux installers don’t add EFI support to the GRUB bootloader by default, if they don’t detect EFI at installation time.
VirtualBox allows us to add a new hard drive to a VM at any time, before or after installing Linux (Settings page, Storage tab). For our present purposes a drive – real or virtual – can be of any capacity or type (SATA, IDE…) If you’re testing on a real computer, any old abandoned drive will do.
Here are the specific steps, whether you’re using a real or a virtual
drive. In the following, I’m assuming that Linux sees your spare hard
drive as /dev/sdb. Naturally, be very, very careful to
check this before blindly following my instructions.
Most of what follows needs to be done as root.
fdisk /dev/sdb- Enter
gto create a new GPT partition table - Create at least one partition. It doesn’t matter if you create more
than one, but the EFI application must be on the first partition. The
partition doesn’t need to be larger than 2Mb for this test, but it’s not
a problem if you use the whole disk. In
fdisk, selectnto create the new partition, and follow the prompts - Use
tto set the partition type. Enter the aliasuefi - Enter
wto write the new partition table
Again, I stress that this procedure will overwrite anything on drive
/dev/sdb. Please ensure that this is the right drive. Even
in a virtual machine it’s a nuisance to wipe your system disk
accidentally.
You should now have a drive that has one partition – unformatted, and
marked for UEFI. If the whole disk was /dev/sdb, then the
new partition will be /dev/sdb1.
Here are a few related points to bear in mind.
- You may not need to create a GPT partition table explicitly. Some EFI firmwares can work with the older, MBR partition format. However, this can’t be guaranteed
- You can assign a volume label if you want, but it’s not essential
- You don’t have to mark the partition as ‘bootable’, if you’re using a GPT partition table. This was a feature of the old MBR format
- Some EFI firmwares will actually search a drive for a bootable EFI partition, but this can’t be guaranteed; make life easier by using partition 1.
To continue:
- Format the new partition as VFAT:
mkfs.vfat -F 32 /dev/sdb1 - Mount the partition on any convenient directory:
mkdir /tmp/mnt; mount /dev/sdb1 /tmp/mnt - Create the EFI directories:
mkdir -p /tmp/mnt/EFI/BOOT - Copy the EFI test program, currently
test.efi, to the virtual (or real) machine you’re working on, in whatever way you prefer. - Copy the EFI test program into the boot directory of the new
partition:
cp /path/to/test.efi /tmp/mnt/EFI/BOOT/BOOTX64.EFI.
You have now created an “EFI system partition” (ESP). It is the
presence of the file /EFI/BOOT/BOOTX64.EFI that makes this
a bootable partition, but note that different architectures have
different names for this file. A 32-bit x86 system might have
BOOTX86.EFI, for example.
Booting from the newly-prepared hard drive
The way to do this depends on the computer you’re using. A real computer will almost always provide a way to select the boot device at runtime. On my Lenovo laptop, for example, it’s the F12 key.
Unfortunately, VirtualBox doesn’t (so far as I know) have a simple way to do this. You’ll need to go to the storage manager for the VM, and simply remove the Linux drive, leaving the newly-created test drive in place. VirtualBox will boot it, because it has nothing else to boot. This at least it proves that you’re running on bare metal, because you have no operating system disk installed in the VM.
It’s easy enough to add the Linux disk back, to boot Linux again, if you need to change something.
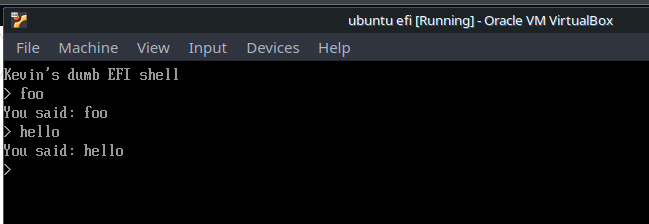
Here’s what the EFI test application looks like, after booting in a VirtualBox VM.
Closing remarks
To boot an EFI program on a hard drive, you’ll need to create an EFI
system partition. This is the first partition on the drive, formatted as
VFAT, and with the test application installed in
/EFI/BOOT.
Some UEFI firmwares are quite flexible, and can be told to boot a specific file from a specific directory on a drive you select. However, creating an ESP should work on any computer that supports EFI.
Coming soon…
In the next article in this series, I’ll explain how to install the EFI test application onto a bootable DVD or USB flash drive.
Have you posted something in response to this page?
Feel free to send a webmention
to notify me, giving the URL of the blog or page that refers to
this one.


